Tracking Your Page Visitors

See not only how many people are viewing your page, but see where they came from, what they were looking at and for how long. Take a look at statistics regarding the site as a whole, such as percentages of browser types or most popular pages. This Tracker will even break down information, such as what people are searching to find your page.

I have always used StatCounter.com to track my page statistics. I have only tried a couple of other services like this to watch statistics regarding my sites, however StatCounter has always been easy to use and rich in detail. They create the code for your Counter and everything.


Easy to understand graphs and charts show statistics that help you adjust your page to suit your potential audience. Try them today it's free, StatCounter.com.

Getting Started:

HTML Tags are the codes we are going to use to define content to an Internet Browser (i.e. Internet Explorer, Safari, Opera). HTML Tags use an open and a closing tag:

<html> is the opening tag. 

</html> is the closing tag.

Everything within our entire script will go between these two tags. There are several other tags that are necessary that tell the browser how to lay the script out on the page. 

The HEAD Tag

This area of the script is the part that runs in the background, it can be the behind scenes part of your page where codes that are entered define to the browser how the content will appear to the viewer.
<head> opens this area and </head> closes this area.
It isn't necessary to keep everything right on top of each other, feel free to put a few returns between the tags for neatness.

The TITLE Tag

Simply stated this is the title of your page, the text will appear on the browsers upper left hand corner. Put you pages name in between these tags:
<title> Page Title </title>

The BODY Tag

This is where the main part of your document will go. Everything that is visible to the viewer will be in between these tags. There are many attributes that can be added and altered in regards to this Tag, for more information click here.  An example of this tag would look like this:
<body> Main Page Content </body>

The Text 

There are two ways to control the way the text appears on a page. One is to define with FONT Tags a specific area of text, or leave it to the BODY Tag to specify for the whole document. Even if you use the BODY Tag to set the base colors, you can still use the FONT Tags in the script to change those specific areas. 

To see the BODY Tag Attributes, Click Here.

To See the FONT Tags and Attributes, Click Here.

Example Script:

<html>
<head>
<title>
Your Page Name Here
</title>

</head>
</body bgcolor="black" text="yellow">

 
Page Content  

</body>
</html>

Don't know where to enter this script, Click Here for more info.

Where can I put my HTML?

HTML Must go in an editor. There are several web hosting services that will allow you to build a page using an editor. Blogger.com has an Editor for editing blogs, but I have found that you can simply delete the default script and replace it with your very own script. There are several things on this site that you could use in the template that they have already made for your page. However the emphasis of this guide is to start from scratch so that you may learn all the different elements of the HTML document.  So delete that Template Script and start from scratch. Everything you need is right here in this Guide. Remember, if you do want to start from scratch using Blogger.com, it's recomended that you "Revert To Classic Template" found at the bottom right of the Template Editor Page. You won't be using the Widget Templates with this form of HTML. Widgets are designed for people who do not know how to edit web scripting.


This is the Classic Template Editor, the old version that Blogger has to edit your page. Dashboard>Template>Edit HTML

There are other palces to host your HTML Document such as Angelfire.com and Tripod.com. The editors are made for anyone from 'Beginner' to 'Advanced' User. Some of the benefits of using a more complex hosting service is the ability to do things such as making a page using frames, which is not a practical method on Blogger.com. 

Font Tags and Their Attributes

The font tags define to the browser how big, what color and which style the text is. There are the attributes that define the over all text of the entire page. However this section will show you how to define individual areas of text, whether it be the color of a link or making the whole paragraph italic and bold.

The size= attribute simply defines what size the text should be.

The color= attribute of course defines the color of the text. There are two ways to define the text, one is to simply type the color (blue, red, green, etc.). The other way is to use a hexcode color chart to find the # for the exact color you would like to use. The attribute would look like this color="#FFFFFF" The F's in this attribute would make the color white. To see a hexcode color chart, click here.

Example Script:

<html>
<head>
<title>
Your Page Name Here
</title>

</head>
</body bgcolor="white">

 
</font size="2" color="orange"> Text made of Orange! </font>  

</body>
</html>

Layout Using a Basic Table

This summary is not available. Please click here to view the post.

Table Alignment

You can use attributes to define where in a table cell you want the content to favor (i.e. top, bottom, left and right).

There are also attributes that 'pad' the content called cell padding and cell spacing.

What are Tables?

Tables are little boxes that divide content into sections. You can use attributes to size and color boxes and even add borders. It is even easy to organize a page using Tables, with so many attributes it's easy to create a unique look. 

See the following sections to see how to add and modify these Tables to your page. 


-Tables as a Layout
-Table Backgrounds
-Table Border Colors
-Table Alignment
-Table Spanning


It's not hard after you've learned how to make changes to the Tables Tags, to start on the First Lesson, Click Here.

Image Tags

There are some tags that don't have a closing tag. This is one of them. The Image Tag is how you display an image on your page. In the tag you can use attributes to define how the Image will look in the document. You can even use an image to make a link, for more information on this topic, click here. 

The Image Tag looks like this:

<img src="http://www.photourlhere.com/">

Then of course there are the attributes to define the image:

width="200" This attribute would make the image 200 pixels wide on the document.

height="200" This changes the height, also measured in pixels.

border="1" This defines the outline around the Image, to set to no border, simply use the number 0.


If you don't know where to go to get the Image Address or URL, Click Here to see a demonstration.


Using an Image as a Link

In order to to use an Image as a Link, you must wrap the Image Tags with Hyperlink Tags which look like this:

<a href="http://www.linkaddress.com"> and of course </a> is the closing Tag defining how much content to make clickable.

Place the Image Tags in between the Hyperlink Tags like this:

<a href="http://www.linkaddress.com"> 
<img src="http://www.photourlhere.com/">
</a>

To see a list of the Image Tag Attributes, Click Here.


If you don't know where to go to get the Image Address or URL, Click Here to see a demonstration.

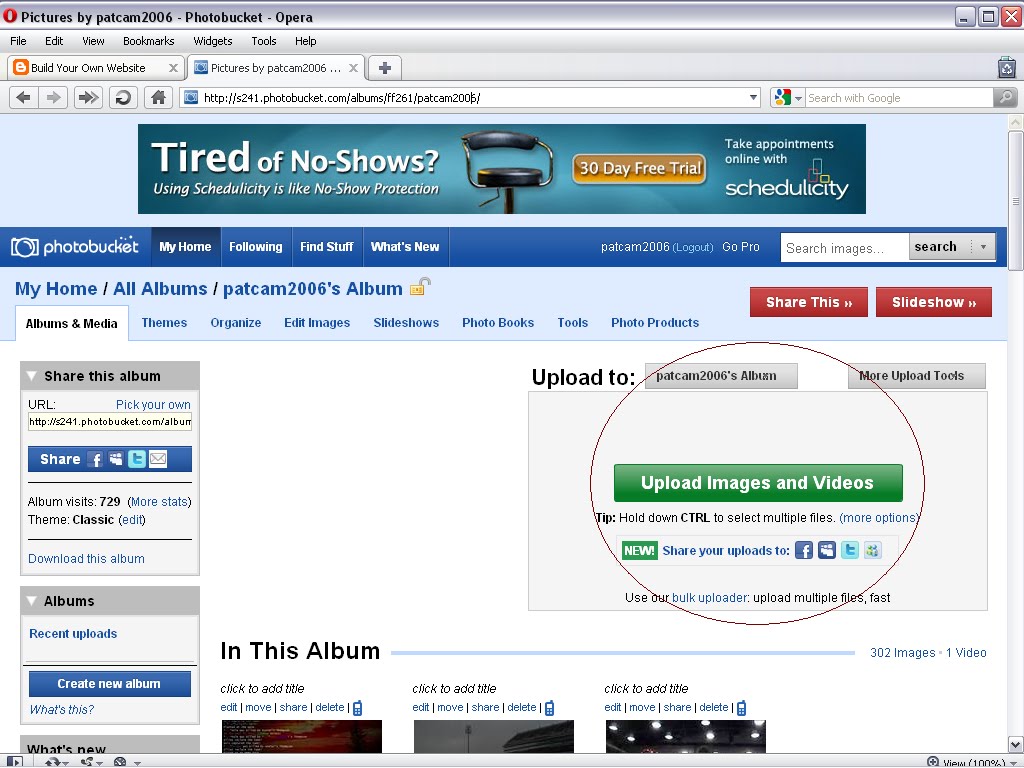
Obtaining a Photos Address or URL

We are going to be using PhotoBucket in this demonstration. So if you don't have a PhotoBucket account this may still give you an idea of what to do to retrieve your image address.

First, Upload the Photo or Image you want to use on your webpage.

When you finish Uploading the photo/image, get the address as provided with the file:

The URL should look like a web address -  http://www.photourls.com/pic1.jpg

This is the address to enter into the Image Tag. Click Here to learn how to use the Image Address in an Image Tag.


BODY Tags and Attributes

The BODY Tag can have several attributes within the tag, these all go in the opening tag, there is nothing to change in the closing tag, it remains as before. An attribute for the body tag would look like this:
<body bgcolor="white">

This attribute would change the background color to solid white, here are some more attributes that can be used to set the base for the entire document:

background="http://www.photoaddress.com/" this attribute can be used to make an image the background of your page. You must have a Photo Hosting Account somewhere to upload the photos to the internet and obtain the photo's address on the web. A photo hosting account basically takes image files you have on your computer and makes them a document on the internet. After they are on the internet, you can link to that document and embed them into your page. For more on this, Click Here.

text="black" Would make the default text color in the document black.

link="blue" Makes all Links default color blue, this changes after the viewer has visited the link.

vlink="navy" Makes the pages that the viewer has already visited navy. This color remains navy until the viewer clears their browsers History.

alink="red" if the viewer clicks Back, when they return to your page the Link they clicked on will be highlighted red.

Always remember to use the close BODY Tag at the bottom of the script.

Example Script:

<html>
<head>
<title>
Your Page Name Here
</title>

</head>
</body bgcolor="white" text="black" link="blue">

 
</font size="2" color="orange"> My First Page! </font>  

</body>
</html>

Using Text as a Link

You can make a link that when clicked takes the user to another webpage. Hyperlinking is as easy as adding a tag to define where to direct the user to when they click on a link. A hyperlink tag looks like this:

<a href="http://www.webpagehere.com/"> this would go in front of the text you were making clickable, in the parenthesis is the address of the website you are linking to (Home Page, Facebook, etc.). 

</a> follows the text that you are making a link. This defines to the browser how much text to use as the link.

You can use the <FONT> Tags on the text you are linking, just put the tags inside the to Hyperlink Tags:

<a href="http://www.webpagehere.com"> <font size="2" color="#ffffff" face="verdana"> Text Link Here </font> </a>


Example Script:

<html>
<head>
<title>
Your Page Name Here
</title>

</head>
</body bgcolor="white">

 
<a href="http://www.address.com/"> </font size="2" color="orange"> View by Clicking NOW! </font> </a>

</body>
</html>

Table of Contents - Site Map

Introduction

A basic overview of this Guides Mission and what to expect from the content. 

Getting Started

Explaining the HTML Tags and getting acquainted with the most basic Tags. 

Where to put HTML Codes

Explains the need for an editor and example of a Classic Template Editor on Blogger.com.

Font Color & Size

Explains how to use the FONT Tags in a script

Using Text as a Link

Explains how to create a Link using basic Text

Add Pictures and Images

Explains the Image Tags and how to use them.

Use an Image as a Link

Explains how to create a Link using an Image or Picture.

Attribute Reference

Basic functions of common attributes and how to place them in Tags.

Headings

Explains how to use the Heading Tags to create a Title or Header.

Lists

Explains how to create a List, i.e. grocery list, to-do list, etc.

Text Alignment

Explains how to use Paragraph Tags to align text left, right, etc.

Text in Bold, Italics, etc.

Explains how to use the Bold, Italic, Underline, Strikeout and Blink Tags.

Center Tags

Explains how to use the Center Tags

Marquee Scrolling Text

Explains how to scroll text and more across a Browser screen using Marquee Tags.

Paragraph and Line Breaks

How to use Paragraph spacing and decorative lines.

ƒunny £etters & §ymbols

A collection of funny letters I have ran across, i.e. Copyright and Trademark Symbols.

....More Pending.


Introduction

Welcome to HTMLwebsites.blogpot.com, a guide to start a Webpage from scratch. Using HTML scripts to build a website is an elaborate process. I have spent numerous hours creating tutorials on how to use various scripts to express through code that which you would imagine on the monitor.  A lot of the tutorials in this site have links to navigate you to information that may pertain to that section. I tried to stick to a basic color layout and explanations as to not cause confusion. Please feel free to wander around through these pages. I will try to add more advanced scripts and commands as the site matures, so check back often. Also, I plan to venture into explaining certain add-on type applications such as Facebook for Your Webpage and Playlists, etc. You can Copy and Paste any of the codes in this guide to customize Your Blog or Website.

Thanks for visiting and come back soon!

Click Here to get started.

Paragraph and Line Breaks

There a few different ways to divide a page with Paragraph and Line Breaks.

<p> and </p> are the Paragraph Tags. These will create space above and below the content within these Tags.

<br/> is a tag all by itself. One of these tags creates a single Line Break. You can use as many as you like to create the amount of space desired between content.

<hr/> This Tag, called the Horizontal Rule will create a paragraph size break in the page content and also create a visible line. Here is an example:


A neat thing about this Tag is that you can adjust the line with attributes, here are a couple:

color="white"

width="200"


Example Script:

<html>
<head>
<title>
Your Page Name Here
</title>

</head>
</body bgcolor="black">

 
Page Content

<br/>


<p>

Paragraph Content 

</p>


Page Content

<hr color="yellow" width="75%"/>

</body>
</html>


Table Tags Explained

The first thing you need to know is how the basic Table is laid out. The Following are the Table Tags in the most basic order:


Funny Letters

I get many searches for: 'funky letters for myspace.' Some people have spent countless hours putting these letters together to make pages worth of information written in pure funky lettering. Here's my collection so far, feel free to Copy and Paste them for your Blog, Myspace, Facebook or Website.

 ▓▓▓▓▓▓▓▓. ⊙⊙ ☠

 ◄◄ REW ► PLAY ▌▌PAUSE █▌STOP ►► FF


█████ ◄╞,          ş ą ğ ♪

♥♡♥♡ ♥ ☺ ღ ๑ ♠ ۩ ▶Music♩♪♫♬ Volume: ▁ ▂ ▃ ▄ ▅ 

 ❒ Yes ❒ No ✔ 

TO DO: ☑ A bit of tweeting, ☑ Lay around, ☑ Drink beer, ☑ Be Awesome.


There's so many, look.....

€ 
ƒ 
… 
† 
‡  
Œ  
• 
—
™ 
š  
œ 
Ÿ 
¡ 
¢ 
£ 
¤ 
¥ 
¦ 
§ 
¨ 
© 
ª  
« 
¬ 
®
¯ 
° 
± 
² 
³ 
´  
µ 
¶ 
· 

¹
º  
» 
¼ 
½ 
¾ 
¿ 
À 
Á
 
à
Ä 
Å  
Æ 
Ç 
È
É 
Ê 
Ë  
Ì 
Í 
Π
Ï 
Ð  
Ñ 
Ò
Ó
Ô
Õ 
Ö
× 
Ø 
Ù 
Ú 
Û 
Ü 
Ý 
Þ
ß  
à 
á 
â 
ã 
ä
å  
æ 
ç 
è 
é 
ê 
ë 
ì 
í 
î 
ï 
ð  
ñ 
ò 
ó 
ô 
õ 
ö 
÷ 
ø 
ù 
ú 
û 
ü 
ý 
þ 

ÿ

To use any of these letters, simply drag a box over the text, right click and copy the letter. Then go to where you want to use the letter, right click and paste.

Ctrl X

  • "Cut" remove the selected item but save to clipboard.

Ctrl C

  • "Copy" the selected area to the clipboard, without removing.

Ctrl V

  • "Paste" the item you saved to the clipboard to the area you are editing.

Frogger


<script src="http://www.gmodules.com/ig/ifr?url=http://www.atlas-labs.net/gadgets/widget/frogger/frogger.xml&synd=open&w=468&h=373&title=Frogger&border=%23ffffff%7C3px%2C1px+solid+%23999999&output=js"></script> 

Simply paste this code into the BODY of your Script.

Tetris On Your Page


 <script src="http://www.gmodules.com/ig/ifr?url=http://www.atlas-labs.net/gadgets/widget2/arix/arix.xml%3F1&synd=open&w=468&h=368&title=Arix+Tetris&border=%23ffffff%7C3px%2C1px+solid+%23999999&output=js"></script>

Simply paste this code into the BODY of your Webpage.

Bejeweled on Your Page


<script src="http://www.gmodules.com/ig/ifr?url=http://bejeweledg.googlecode.com/svn/trunk/bejeweled.xml&synd=open&w=500&h=370&title=Bejeweled&border=%23ffffff%7C0px%2C1px+solid+%23004488%7C0px%2C1px+solid+%23005599%7C0px%2C1px+solid+%230077BB%7C0px%2C1px+solid+%230088CC&output=js"></script>

Simply Paste this code in the BODY of your Script.